
A question that we often get is why do we not always supply presupported STL files? The truth is that we do, but we supply them in Lychee Slicer .LYS format as there are many benefits to having it in this format.
First I'd like to say that our supports are amazing (if I do say so myself, but you can also ask any of our customers who will say the same!). I've been professionally printing resin miniatures since 2016 and always hold myself to the highest standards. Because I not only test print every miniature but also we sell prints in our store which we produce in-house, so its important that the clean-up operation on prints is as simple as possible, that opportunity for breakage is minimal and that the miniature isn't scarred by the supports.
https://Fauxhammer.com even recommends using our models to test your printer's calibration because they recognise that buying presupported models doesn't always guarantee you a good printing experience unless you get them from The Lion's Tower! :-)
Now with that bit out of the way...
Why do we supply our customers with the Lychee Slicer files?
Not all printers and resins are the same, and some more flexible resins may require the support rods or tips to be thickened up. There are so many resins and to try to accommodate all of them is impossible so we instead provide you supports that meet our own internal requirements, knowing that 90% of customers using common resins should have a wonderful printing experience. For those of you that don't we would first say to ensure that your printer and resin is properly calibrated or our customers, giving you editable supports means that you have the ability to make tweaks and adjustments to compensate for your particular resin if you require thicker contact point.
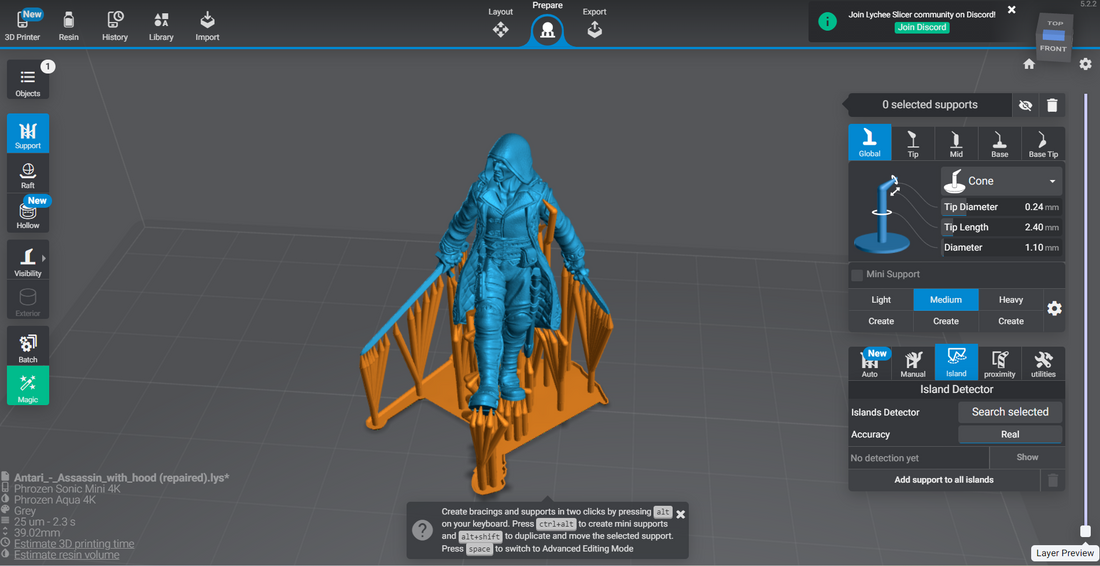
Lychee allows you to either individually select a single support or make selections based on the type of support (light, medium or heavy). its worth noting that you can configure those definitions yourself though, but you can also download our support settings HERE and just import them and use them yourself. Once you have supports selected, either singly or as a group, you can make alterations to the tip size, support diameter, base, tip length etc and all of your changes will be applied to the selected supports.
Resizing models
I wrote an article about scale which you can read HERE, where I explained the differences between scale and model size - here we are talking about resizing models as rescaling is impossible without physically modifying the sculpt to account for the new scale. The settings in Lychee though do refer to scale so for the purposes of this explanation and to avoid confusion, rescale = resize. All of our miniatures are sculpted to 32mm scale and you can get a little bit of wiggle room if you want to reduce that down to 28mm or bump it up a touch to make them more of a painter's piece (say 40mm for example).
If you want to do this, in the Layout tab click on the model and select the Scale option on the left hand side of the window (Shortcut key "S"). you'll see the Scale dialogue appear on the right hand side of the window. you want to make sure you have "Uniform Scaling" turned on and then modify the % of one of the values. 88% will reduce the model to 28mm scale, whilst 125% will increase it to 40mm, 169% to 54mm and 235% to 75mm.
Once the model has been resized, you'll notice that the supports remain the same size and the base of the supports hasn't moved, so you'll have supports intersecting the model and generally looking a real mess! Simply go to the "Prepare" tab, and select the supports button. Press Ctrl+A to select all of the supports and then press Alt+R and this will recalculate the supports moving the base of the supports clear of the model so the intersections are removed. You may need to look over them and give them a bit of a cleanup but most of the time you should be good to go ahead and print at this point.
It's worth noting though that the larger you make the model the greater the chance of failure will be as you'll increase suction on the model (particularly if you opt to hollow it) and also the weight of the model on the supports which can cause regular medium supports to buckle whilst still in a partially cured state in the printer. You'll need to either add bracings or thicken the support diameters to overcome this.
Adding extra support anchors
To add extra support anchors to prevent the model detaching from the supports, I always recommend adding a flower configuration (pictured below) of medium supports (0.24mm tip) rather than heavy supports. Its important that there is a small gap between the tips but for extra rigidity you want the support bodies to overlap a little. The reason for this is a heavy support with a 1mm tip will need to be removed very carefully using a pair of flat cutters, a craft knife and a file/sandpaper to avoid damage - a time consuming process and there is the potential to cause a large divot in the model surface if you mess up. Instead you can achieve a 1.44 mm contact area by clustering 6 supports together in a flower configuration, but the 0.24mm supports will remove far cleaner and with less damage than the 1mm heavy support.

If you don't want to use Lychee Slicer for your slicing, you can export the models from Lychee with the supports attached. Simply position the models on your plate and press CTRL+E to export them all as one STL including the supports. Important - these will show up as in need of repair when loaded in because the supports are generated as separate shells and the slicer software is going to expect to see a single shell for each model. As long as the files were repaired in Lychee Slicer, there is no need to repair the supported files and doing so may actually reduce the quality of the supports.
Professional Benefits
Using Lychee Slicer in a professional capacity I do subscribe and pay for the Pro version and I believe its a great value software solution. It gives you some advanced tools to use, but the one that I use most often is the Advanced supports, which allows you to manually position and scale each joint of the supports so you have finer control of the placement of supports which ultimately helps with the ease of removal and clean-up at the end of the printing process.